Step 3 Chart
Table of contents
- Step 3 Chart
- Vega - Vizualisation Grammar
- Task 3.1 Specify Summary Chart
- Dictionary
- Task 3.2 Select Data
- Task 3.3 Display data
So far, our web server is capable of collecting COVID-19 data from a web service and serving it to the web browser. However, the web server does not bring any additional value yet. There are many different tools, frameworks and libraries to visualise data. In this assignment, we introduce Vega, which focuses on visualisation aspects rather than the code.
Vega - Vizualisation Grammar
As described from its website, ‘Vega is a visualisation grammar, a declarative language for creating, saving, and sharing interactive visualisation designs. With Vega, you can describe the visual appearance and interactive behaviour of a visualisation in a JSON format, and generate web-based views using Canvas or SVG’ Vega.
We think that this approach might enable designers of visualisations to focus on graphic concepts rather than technical implementation.
Task 3.1 Specify Summary Chart
Vega builds on a data structure that we have already encountered: JSON. Instead of writing code, we describe the elements of the visualisation. Then, we use this description in different programming languages to generate visualisations. Let’s look at the dashboard that we envision, once again, to know what is ahead.
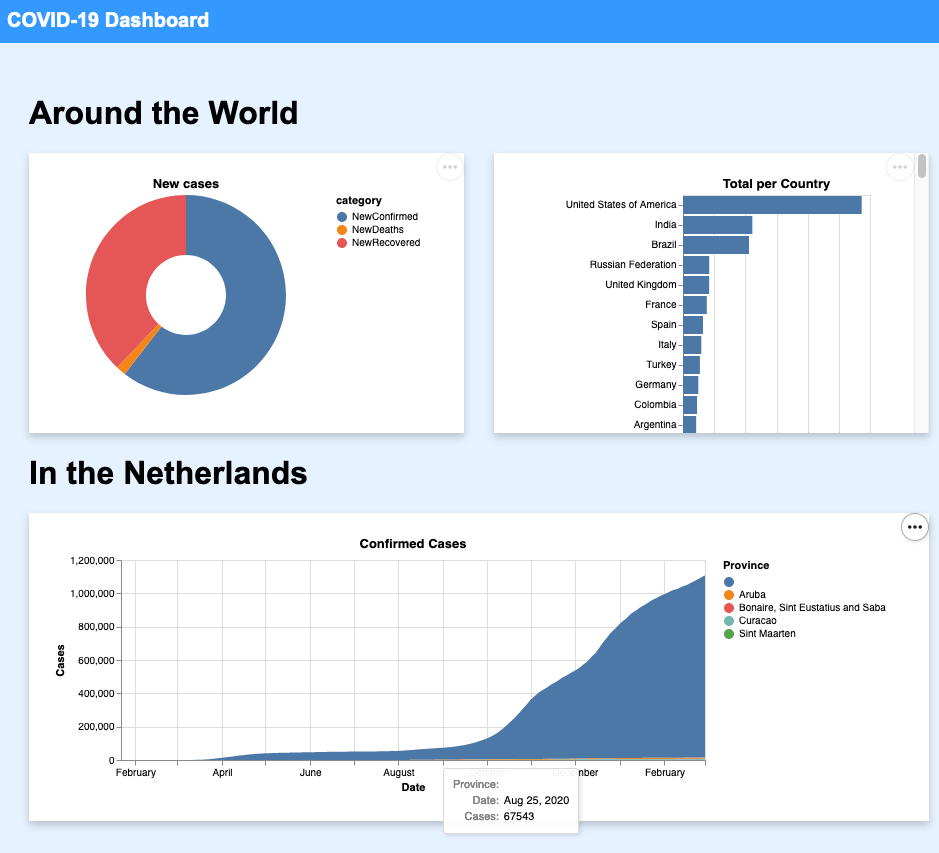
We start with the top-right chart summarising the global COVID situation by listing all case counts per country. In Replit, create a folder templates. It will contain the templates of our three charts. Inside this folder, create a file summary.json and paste the following:
1
2
3
4
5
6
7
8
9
10
11
12
13
14
15
16
17
18
19
20
{
  "$schema": "https://vega.github.io/schema/vega-lite/v4.json",
  "title": "Total per Country",
  "data": {
    "values": []
  },
  "mark": {
    "type": "bar"
  },
  "encoding": {
    "x": {
      "field": "TotalConfirmed",
      "type": "quantitative"
    },
    "y": {
      "field": "Country",
      "type": "nominal"
    }
  }
}
It is all we need to describe the chart.
- The schema, like for SVG, is a link to the rule definitions of Vega - all the elements that we can put in this JSON structure to render a valid Vega chart;
- The title of the chart;
- The data, an array of values to show on the chart. Here it starts empty, as each time we show the chart, we will get the latest data and update the array;
- The mark specifies the ‘idiom’ of the chart. For now, we leave Vega to generate a default bar chart;
- The encoding is the place where we define what should go where. There are
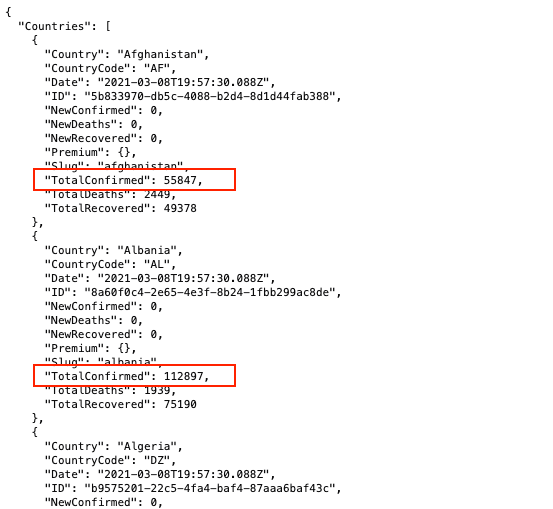
xandyaxes. Looking at the data extracted below (from our own server), the total confirmed cases per country appears associated with the keyTotalConfirmedin each country. We use this key forx: it is a number, thus, it is of the typequantitative. Similarly, for theyaxis, we use the keyCountryto hold the ID of each country. This time, the type will benominal(not a quantitive value, and also not ordered - it cannot be sorted). Note that the countries are on theyaxis so that the long list of countries unfolds vertically. The other way around would also work.
These are all the details needed for Vega to generate a bar chart. We now need to bring in the data.
Dictionary
We briefly mentioned dict in the previous Step to wrap a list of data in a JSON data structure with key/value pairs. You can see a dict as an equivalent of a JSON object in Python. It is an object composed of key/value pairs that we can manipulate in Python. All JSON data structures are mapped into dict.
As mentioned in the previous Step, we define a dict with curly brackets { }.
1
2
3
4
my_data_dictionary = {
  "Country": "Netherlands",
  "TotalConfirmed": 1234
}
To access the value associated with a key, we state the name of the dict variable and specify the key between square brackets.
1
country = my_data_dictionary["Country"]
We turn the expression around to assign the value to a specific key.
1
my_data_dictionary["Country"] = "Netherlands"
Task 3.2 Select Data
It is already enough information about using Dictionaries to manipulate our data. In the sample data from the previous task, we know that the data comes in a JSON object with the key Countries, including the detailed list of all countries. So what we need to do is:
- to get our Vega template;
- get fresh data from the API;
- extract the list of countries with the key
Countriesfrom our object; - insert this list in the Vega template.
To load the Vega template from the JSON file, we import the json module at the top of main.py. Then, we focus on the function serve_summary() which currently contains only a call to the function download_summary(). The steps are the following:
1
2
3
4
  # Load JSON template from summary.json
  # Download summary from the COVID API
  # Add the data to the template
  # Send the chart description to the client
To load the JSON template, we use the json module. We use open() that we have already used in the previous assignments to open a file. We give this file to the function load() from the json module. It brings in our JSON template in Python, as a dict.
1
2
  # Load json template from summary.json
  json_template = json.load(open("templates/summary.json"))
Next, we download the API data. Instead of returning this data directly, we keep it in a variable: another json structure in the form of a Python dict.
1
2
  # Download summary from the COVID API
  json_data = download_summary()
Then comes the moment to fill the data from the API dict into the chart template dict to have an updated chart with each new request. We access dict values with square brackets as we just introduced. Thus, we look for the key Countries which we assign to the key values, inside the key data of the Vega template (this is where Vega is expecting that data).
1
2
  # Add the data to the template
  json_template["data"]["values"] = json_data["Countries"]
Finally, we are ready to return the filled Vega JSON template containing the updated data.
1
2
  # Send the chart description to the client
  return json_template
Run the code and trigger the route /summary to check if the result properly contains the Vega template with the data.
Task 3.3 Display data
We now have a description of visualisation along with the data. Still, the web browser shows a raw JSON data structure. A web page for humans (not JSON raw data) is structured with HTML. HTML stands for HyperText Markup Language and relies on XML data structure (like SVG), with <tag> to open and </tag> to close an element.
Let’s create a folder static and inside this folder create a file index.html with the following content. It starts with a particular tag that indicates that we are looking at an HTML document. The tag <html> contains the whole structure, divided into two parts:
- the head for information not directly visible on the browser page. It sets up, for instance, the
titleshowing up in the web browser tab and importing the libraries that are needed: in our case, we need Vega. - the body describes the structure of the page. At this stage, we have only a tag
<div>(for division), which represents an area/visual element in the document. It is important to note that this division has anidto retrieve/reference this particular area in the document. The last tag isscript, which defines one line of Javascript: the language that defines the page dynamic behaviour (like animations). Here we use the Vega library to download the data from the route/summary. Then, we generate the chart in the area with the idsummary(#indicates that we look for an element id).
1
2
3
4
5
6
7
8
9
10
11
12
13
14
15
16
17
18
<!DOCTYPE html>
<html>
  <head>
    <title>COVID Dashboard</title>
    <meta name="viewport" content="width=device-width, initial-scale=1" />
    <script src="https://cdn.jsdelivr.net/npm/vega@5"></script>
    <script src="https://cdn.jsdelivr.net/npm/vega-lite@4"></script>
    <script src="https://cdn.jsdelivr.net/npm/vega-embed@6"></script>
  </head>
  <body>
    <!-- Where to draw the summary for all countries (Bar chart) -->
    <div id="summary"></div>

    <script type="text/javascript">
      vegaEmbed('#summary', '/summary');
    </script>
  </body>
</html>
Yes, many new things have happened! The modern web combines several languages, frameworks, and APIs, each with critical responsibilities. We will delve into further detail as we go. But, for now, remember the web browser downloads this HTML structure (the backbone - skeleton - of your webpage). From there, it knows which libraries it needs to download and how to structure the page. Finally, through JavaScript, it needs to run the vegaEmbed() function to download and display the chart.
The final element is how do we get this HTML document into the web browser? The webserver needs to serve it like it serves the JSON data structure. It is time to replace the sentence "A nice COVID dashboard" from the route / by the following line:
1
2
  # Return the static file 'index.html'
  return server.send_static_file('index.html')
By default, the method send_static_file() from Flask looks for files in the folder static and returns them if they exist. Thus, this serves the web page and let the magic happen.
Run the code and trigger the route / to see the chart with the data.
Two small tips to quickly improve this chart. First, in the Vega template, we can add the key tooltip with the value true in mark to make the chart reactive to the mouse cursor. We can also add the key sort with the value "-x" in y to sort the countries from most to least impacted. There are many options that you can explore from the Vega documentation.