Step 2 HTTP Requests
Table of contents
- Step 2 HTTP Requests
- HTTP Request
- Task 2.1 Download Summary
- Task 2.2 Download Confirmed Cases per Country
- Constant
- Task 2.3 Log Errors and Service Access
We have identified a service to access the latest COVID-19 data. However, we need our Python code to download the data itself, which is different from what we have achieved in Python so far. Currently, our server serves content on the web, but it does not collect content from the web. For this, we need to make an HTTP Request.
HTTP Request
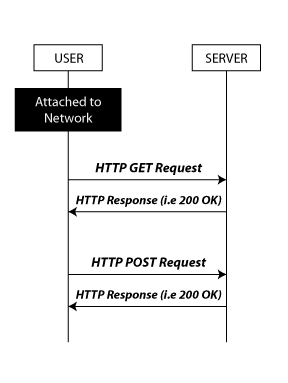
An HTTP Request is a message that a computer sends to the web to receive information in response: the HTTP Response. It is what we want to achieve to collect data from the covi19api.com service. The algorithm of an HTTP Request has the following elements:
URLWhere is the resource located?methodWhat is the HTTP method?responseWhere should the response be stored?responseStatusWhat is the status of the response? Did it succeed? Did it fail?successActionWhat shall we do if the request was successful?errorActionWhat shall we do if the request failed?
HTTP Request Algorithm
The algorithm looks as follows:
1
2
3
4
5
Send the request to [URL] using [method] and store the response in the variable [response]
Then, check the [responseStatus] for a 'successful' code
Do the [successAction]
Otherwise, something went wrong
Do the [errorAction]
The HTTP protocol has an extensive list of response codes to indicate a response’s status (i.e. how did it go?). For example, the typical successful status code is 200. You can see the complete list of HTTP response status codes on MDN Web Docs (You might have seen 404 before).
Regarding the HTTP methods, the most commonly used are GET (to get data from a web server) and POST (to send data to a web server).
HTTP Request Sequence Diagram
HTTP Request Python Syntax
Switching to the Python syntax, we use the function get() from the module requests to make an HTTP request with the GET method. The same structure would apply for a POST request (with the function post() instead).
get() takes a parameter:URL (where is the resource located?). Here we use the URL that we typed in the web browser in the previous step. We store the result of get() (what comes back from the web service) in the variable response. The HTTP response includes a property: status_code, which contains the request’s HTTP response status. As discussed above, we check for the status 200, meaning that the request was successful. Otherwise, we use the else to run an errorAction.
1
2
3
4
5
6
7
8
9
10
from requests import get

# Send the request to url using the get method and store the response in response
response = get("http://api.covid19api.com/summary")
# Check response status for the code 200 (OK)
if response.status_code == 200:
    # Do successAction
# Otherwise, something went wrong
else:
    # Do errorAction
Task 2.1 Download Summary
Let’s give it a try. First, in your Replit project, create a new file, covid.py, where we interact directly with the COVID19 API.
To make an HTTP request inside this file, we first need to import the get function (see the first line of Python code example above). Then, we create a function download_summary(), as follows:
1
2
3
4
5
6
7
8
9
10
11
12
13
def download_summary():
	"""
  Send HTTP request to API /summary and return the response in JSON format.

  API details: https://documenter.getpostman.com/view/10808728/SzS8rjbc#00030720-fae3-4c72-8aea-ad01ba17adf8

	"""
  # Send the HTTP request
  # Check for the HTTP response status 200 (OK)
  	# Return the response as JSON
  # Otherwise, something went wrong
    # Show the error message
    # Return an empty result
Convert the comments into Python code based on the previous step, ‘HTTP Request Python syntax’. We miss what to do in successAction and errorAction. In these cases, the success action should return the JSON object response (what we were looking at in the web browser in Step 1). We extract it from the response variable as follows:
1
2
        # Return the response as JSON
        return response.json()
If it fails, it would be practical to get information about the error. We can create an error log to print the HTTP response status. Then we would finish by returning an empty JSON object. Note: we need to import the logging module at the top of the file.
1
2
3
4
        # Log the error message
        logging.error(f'An error has occurred: HTTP status {response.status_code}')
        # Return an empty result
        return {}
It completes the implementation of the HTTP request in Python. We can go back to the file main.py and import this function at the top of the file (the same way we imported the SVG functions in the previous assignment). Finally, we can replace the sentence "Bar chart summary of COVID cases per country." by a call to the function download_summary(), which returns the JSON data instead of the sentence.
Run the code and trigger the route /summary to check if it serves the COVID data. The expected result is the same as directly calling the COVID19 API: our Python code downloads the data and forwards it to the web browser.
Task 2.2 Download Confirmed Cases per Country
Let’s repeat this process to download the data from the /country API. We want to download the historical data for the Netherlands. Back in covid.py, create a function download_confirmed_per_country().
1
2
3
4
5
6
7
8
9
10
11
12
13
14
def download_confirmed_per_country(country):
  """
  Send HTTP request to API /country/<country>/status/confirmed to receive the daily number of confirmed cases for the requested country. Return the response in JSON format.

  API details: https://documenter.getpostman.com/view/10808728/SzS8rjbc#b07f97ba-24f4-4ebe-ad71-97fa35f3b683

  country -- the name of the requested
  """
  # Send the HTTP request
  # Check for the HTTP response status 200 (OK)
  	# Return the response as JSON
  # Otherwise, something went wrong
    # Show the error message
    # Return an empty result
The only major difference from the previous ‘download_summary()’ definition is the new function parameter country. We want to specify the country’s name as a parameter to reuse this function for an arbitrary country. Therefore, we use the country parameter in the HTTP request URL.
1
2
    # Send the HTTP request
    response = get(f'http://api.covid19api.com/country/{country}/status/confirmed')
In main.py, we import this new function at the top of the file. Finally, we can replace the sentence " Area chart of COVID cases over time in the Netherlands. " by a call to download_confirmed_per_country(). It returns the JSON data instead of the sentence. Let’s not forget to provide the name of a valid country when we call our function:
1
    return download_confirmed_per_country("netherlands")
Run the code, and trigger the route /netherlands to check if it serves the correct COVID data. Once again, the expected result is the same as directly calling the COVID19 API: our Python code downloads the data and forwards it.
Oh! It does not work! 500 Internal Server Error, what can that possibly mean! Well, 500 is the generic HTTP status code for when something went wrong on the server (instead of 200). If we look at the Terminal in Replit, we can indeed see that something went wrong.

Let’s not be scared out by an error stack: something went wrong, so Python is showing us the list of functions it went through before the error, along with the lines and files, so that we can identify where the problem is. The first thing to notice here are the files: flask/app.py. It tells us that the error occurred in the Flask module that we used for our web server. We will not look at this code as, especially for a well-known module, chances are very high that the issue is on our side. In that case, we look at the bottom, the description of the error itself.
1
TypeError: The view function did not return a valid response. The return type must be a string, dict, tuple, Response instance, or WSGI callable, but it was a list.
It tells us that our Python code returns a list where it is not permitted. It says Response Instance; most lines in the error message are about Flask, so we can safely assume it is about the HTTP Response we try to send back to the web browser. It is the one containing the Netherlands data. Let’s have a look at the Netherlands data once again: http://api.covid19api.com/country/netherlands/status/confirmed.
Indeed, this data does not start and end with curly brackets {}. It starts directly with square brackets []; this is a list of values instead of a JSON object composed of key/value pairs. As this is not JSON standard, Flask does not seem to like it. To solve the problem, we can put this list into a JSON object as follows:
1
2
3
{
    "data": [ ... ]
}
We chose data as the key, but we could have picked any key name. In Python code, we can use a similar syntax to express this. The equivalent of a JSON structure (i.e. a map of keys and values) is the data type dict (for dictionary). We will explore further what we can do with dict when manipulating the data in the next step. For now, we can change the code of download_confirmed_per_country() as follows. We take the list from the response, insert it into a dict under the key data, and return it.
1
2
        # Return the response as JSON
        return { "data" : response.json() }
Rerun the code, and trigger the route /netherlands to check if it serves the COVID data. This time it works, and note the difference regarding the initial response from the COVID19 API: it starts with the key data.
Constant
At this stage, we can make a couple of improvements to our code in covid.py.
First, we are duplicating the URL of the COVID19 API. As duplicating is never a good strategy, we suggest creating a constant variable URL_API at the top of the file, just after the import statement:
1
2
# Create a constant 'URL_API' with the URL of the API
URL_API = "http://api.covid19api.com"
We can now replace this part of the URL in both functions with {URL_API} (using an f-string). It is always good to place all repeating strings as constant at the top of the file.
Task 2.3 Log Errors and Service Access
Like in the prvious assignments, we used logging in Task 2.1 to print errors. As we let our webserver running, we want to keep track of logs. Let’s setup the logging module to keep track of logs in files.
1
2
3
4
# Import and setup logging
import logging
log_format = "[%(levelname)s] - %(asctime)s : %(message)s in %(module)s:%(lineno)d"
logging.basicConfig(filename='covid.log', format=log_format, level=logging.INFO)
The first line is familiar; we import the module logging. Then, we defined the logging format, i.e. what we want to show for each log. If you compare it with Assignment 2 / Step 6, we add a couple of information. First, this setting displays the log level and execution time (asctime). Then, the message (the information usually coming from print()) appears along with the module and line of code (practical as we now have several modules). Finally, the third line puts it all together, saying that we want to write the logs in the file covid.log, with the format defined above for all logs of level INFO or higher. The log levels are as follows: DEBUG (lowest), INFO, WARN, ERROR and CRITICAL (highest). Thus, the above set would show all logs but DEBUG.
Let’s make use of these logs. In covid.py, we have already used logs to show what went wrong for a failed HTTP request. It will now appear in the log file. In addition, we can log access to our API. In this case, we would use the log level INFO. For example, we could generate an info log each time we receive the data with a status of 200 (successful request):
1
2
3
        # Return the response as JSON
        logging.info('Successfully received Dutch data from COVID19 API')
        return { "data" : response.json() }
Rerun the code, and trigger the route /netherlands to see what happens. The web page should work as before. In Replit, you should see much fewer lines in the Terminal. A file covid.log should now exist with a few log statements. As we set up logging for our programme, the logs of module Flask are also formatted the same way and saved in the log file (not in the Terminal anymore).
We now have our web server in place, which fetches data about the most current COVID situation and forwards that to the web browser. Still, this is not a compelling way of presenting this data. That is the goal of Step 3 - Data Visualization.