Getting Started
In this tutorial, you will setup a development environment for Python and Arduino.
1. Atom
The first tool we need is a code editor, commonly called IDE (integrated development editor). For this we will use Atom, as it is open source and popular for its modularity.
Download and start Atom here.
Atom has the typical features of an IDE, we will go through them during this workshop. The first of them is the terminal. A terminal is a text-based interface we use to enter and execute commands on a computer. While we will maximize the use of graphical tools, we will also use the terminal in some occasions.
On the top menu, go to Packages > Settings View > Install Packages/Themes
Search for ‘terminal plus’ and install the first one ‘platformio-ide-terminal’
Now you can open a terminal by clicking on the + sign in the bottom left corner.
2. Python
Python is the main programming language we will use throughout this course. To execute Python code on your machine, you need to install a Python interpreter. We will use Python 3.x (as opposed to 2.x).
In Atom, open a terminal and type in the following command to check if Python is installed on your laptop with the appropriate version.
On Mac, type in
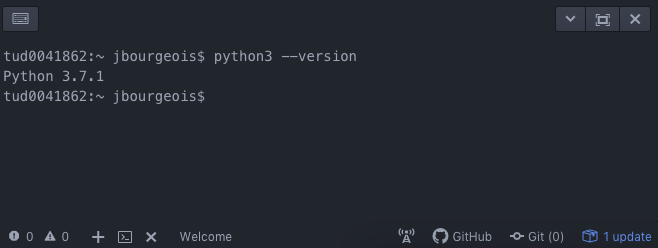
python3 --version
On Windows, type in:
python --version
If Python 3 is installed, the result should look as follows:
If the command results are ‘Command Not found’ (or an equivalent message), you need to install Python 3. Otherwise, skip to section 2.2.
2.1 Install Python
Select, download and install the latest version of Python 3 for your system here.
Windows
Once installed, go to ‘Start > System > Properties > Advanced System Properties >
Environment Variable’ In User Variables, double click on ‘Path’. At the end of
the line, add a semi-colon (;
C:\Users\YOUR_USERNAME\AppData\Local\Programs\Python\Python37;C:\Users\YOUR_USERNAME\AppData\Local\Programs\Python\Python37\Scripts
(Replace YOUR_USERNAME with your Windows user name)
Close and reopen the Atom to check the installation, by typing in your console:
python --version
And verifying that the correct version of python was installed.
Mac
After installation, close and reopen the Atom to check if it was successful, by typing the following on your console:
python3 --version
if the correct version of python is shown, the install was successful.
2.2 Python Dependencies
In the Python ecosystem, Pip is a tool that manages packages for us. We will use it to install and update any Python library our project relies on. You can check whether Pip is already install with the following command.
On Mac, type in:
python3 -m pip --version
On Windows, type in:
python -m pip --version
If it is not found, you can install it as follows.
On Mac, type in:
python3 get-pip.py
On Windows, download the file get-pip.py and save it (CMD+S or Ctrl+S) in your Downloads folder. In the Atom terminal, type in the following command:
python Downloads\get-pip.py
2.3 Python in Atom
The next step is the Python plugin for Atom, to get some help specifically for Python in Atom. Go to the terminal and type:
On Mac, type in:
python3 -m pip install 'python-language-server[all]'
On Windows, type in:
python -m pip install 'python-language-server[all]'
When it is installed, on the top menu of Atom, click on ‘Packages’ > ‘Settings View’ > ‘Install Packages/Themes’. Search and install ‘atom-ide-ui’ and ‘ide-python’.
If you do not have experience with Python, we recommend you to go through the following tutorial to get started: http://www.learnpython.org/
3 Git & GitHub
Git is a version control system (VCS). It helps to keep track of all the changes in your project and sharing these. While it is heavily used by software developers to track and share code, it is also useful to track and share the progress of any design or research process. The principle is as follows: you share a remote repository, you ‘pull’ the latest changes (any files, code, doc…) from your peers from this repository, you make changes on your machine, and you ‘push’ your changes on the remote repository, making them available to your peers.
Here are four short videos with more details:
3.1 Install Git
Download and install Git from here.
GitHub is a popular online platform that hosts remote Git repositories. We will use it throughout the course to host your repo.
3.2 Sign up on GitHub
If you do not have GitHub account, sign up here.
4 Install Arduino IDE
Similar to Atom, the Arduino IDE is an editor with a convenient set of tools to program Arduino-like devices. You can download and install the latest version from here.